To Create a New Query in Design View Click Create
A query specifies criteria that indicates which data fields and data rows are displayed to you. While this is similar in capabilities to the Filter by Form discussed in the datasheet view, a query can be created that combines data from two or more tables.
| To create a query object in Microsoft Access you first click on the Query button in the list of object types. As shown in the picture to the right, clicking on the Query object type displays two methods for creating a new query object:
In this class, we will learn both methods for creating a query. |  |
Create query by using wizard
In the database window, double-click on the "Create query by using wizard" entry to start the wizard.
 | Query Wizard Step 1In the first step of the Query Wizard, you must select the fields you want to display on your query results.
|
| In this demonstration, the First Name, Last Name, City, and Home Phone Number fields in the Student table were moved to the Selected Fields list. | |
 | Query Wizard Step 2 (last step)In the second step of the Query Wizard:
The question "What title do you want for your query?" is misleading. In this wizard, the word "title" means name. |
| In this demonstration, the "title" was changed to StudentQuery and the option to display the results (view information) was selected. The datasheet view displayed at this time looks like the picture on the right: Please see the query datasheet view for information on this view. | 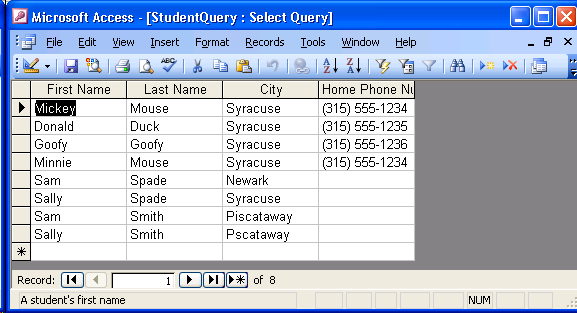 |
Create query in Design view
In the database window, double-click on the "Create query in Design view" entry to create a query using the design view.
 | Show TableBefore the query design view is displayed, you must select one or more tables or queries to use as the basis for this new query. At the moment, the database only contains one table - Student - so this is already selected in the list of tables. Clicking the Add button will add the Student table to the query design view, which is currently displayed behind the Show Table dialog box. At this point, the Close button may be clicked to close the Show Table dialog box. |
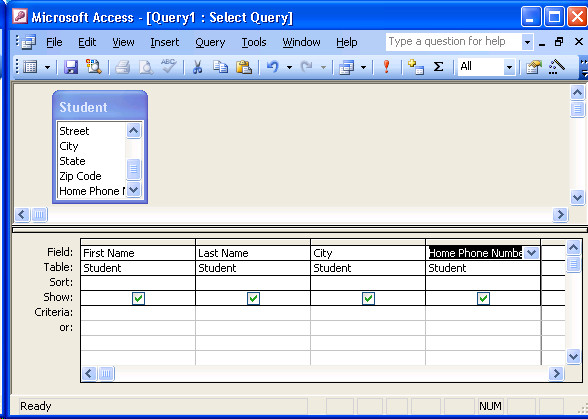
| The query design view displayed at this time looks like the picture on the right: The query design view contains two sections.
An explanation of each row shown in the bottom section follows.
|  |
Create query in Design view examples
Each of the following examples assumes that you've double-clicked on the "Create query in Design view" entry in the database window and that you added the Student table to the query design view.
- Show First Name, Last Name, City, and Home Phone Number for all Students.
- In the top section of the query design view, double-click on the First Name field in the Student table picture.
- In the top section of the query design view, double-click on the Last Name field in the Student table picture.
- In the top section of the query design view, scroll down until you see the City field, and then double-click on the City field in the Student table picture.
- In the top section of the query design view, scroll down until you see the Home Phone Number field, and then double-click on the Home Phone Number field in the Student table picture.
- Click on the Run button
 to execute the query and display the results.
 - Clicking on the View button
 will switch back to the query design view.
 - At this point, you can click on the Save button if you want to save this query. At this point you would give this query object a name. This query name would then be listed as a query object on the database window.
- Show First Name, Last Name, City, and Home Phone Number for all Students that live in Syracuse and whose First Name begins with M.
- Add the First Name, Last Name, City, and Home Phone Number fields to the bottom section of the query design view as described in example A above.
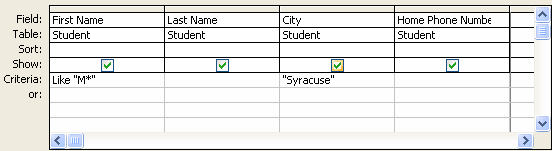
- In the bottom section of the query design view, click on the Criteria cell in the City column. Type Syracuse into this criteria cell.
- In the bottom section of the query design view, click on the Criteria cell in the First Name column. Type M* into this criteria cell.
- Strike the tab key on the keyboard. At this point, the bottom section of the query design view should look like:
- Click on the Run button to execute the query and display the results.
- Clicking on the View button will switch back to the query design view.
- At this point, you can click on the Save button if you want to save this query. At this point you would give this query object a name. This query name would then be listed as a query object on the database window.
- Show First Name, Last Name, City, and Home Phone Number for all Students that live in Piscataway or whose First Name begins with M.
- Add the First Name, Last Name, City, and Home Phone Number fields to the bottom section of the query design view as described in example A above.
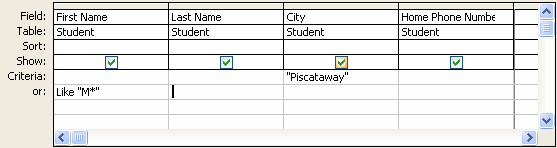
- In the bottom section of the query design view, click on the Criteria cell in the City column. Type Piscataway into this criteria cell.
- In the bottom section of the query design view, click on the Or cell in the First Name column. Type M* into this criteria cell.
- Strike the tab key on the keyboard. At this point, the bottom section of the query design view should look like:
- Click on the Run button to execute the query and display the results.
- Clicking on the View button will switch back to the query design view.
- At this point, you can click on the Save button if you want to save this query. At this point you would give this query object a name. This query name would then be listed as a query object on the database window.
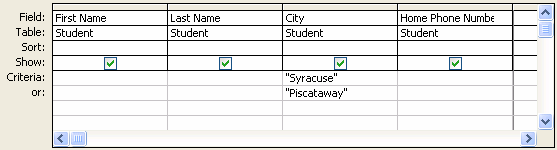
- Show First Name, Last Name, City, and Home Phone Number for all Students that live in either Syracuse or Piscataway.
- Add the First Name, Last Name, City, and Home Phone Number fields to the bottom section of the query design view as described in example A above.
- In the bottom section of the query design view, click on the Criteria cell in the City column. Type Syracuse into this criteria cell.
- In the bottom section of the query design view, click on the Or cell in the City column. Type Piscataway into this criteria cell.
- Strike the tab key on the keyboard. At this point, the bottom section of the query design view should look like:
- Click on the Run button to execute the query and display the results.
- Clicking on the View button will switch back to the query design view.
- At this point, you can click on the Save button if you want to save this query. At this point you would give this query object a name. This query name would then be listed as a query object on the database window.
The First Name field will appear in the bottom section of the query design view in the first column.
The Last Name field will appear in the bottom section of the query design view in the second column.
The City field will appear in the bottom section of the query design view in the third column.
The Home Phone Number field will appear in the bottom section of the query design view in the fourth column.
At this point, the query design view looks like the following:
The data resulting from executing this query is displayed in a datasheet view. This datasheet view would look like:

The data resulting from executing this query is displayed in a datasheet view. This datasheet view would look like:

Comparing these results with example A, we see that only those students that live in Syracuse AND whose first name begins with an M are shown.
The data resulting from executing this query is displayed in a datasheet view. This datasheet view would look like:

Comparing these results with example A, we see that only those students that live in Piscataway OR whose first name begins with an M are shown.
The data resulting from executing this query is displayed in a datasheet view. This datasheet view would look like:
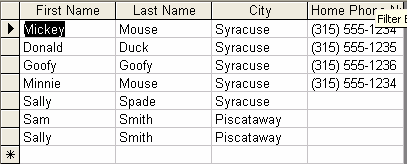
Comparing these results with example A, we see that only those students that live in Syracuse OR Piscataway are shown.
The datasheet view used to display query data has the same features and capabilites as the datasheet view used to view table data.
- Go here for a basic description of the datasheet view.
- Go here for a description of the advanced features of the Datasheet view.
This view displays the Structured Query Language (SQL) statement that Microsoft Access generated based on your query design.
When you run a query, Microsoft Access actually executes the SQL statement displayed in this view. The results produced by executing the SQL statement are then displayed in a datasheet view.
For those of you that are curious, here are the SQL statements generated by Microsoft Access for the four query examples (A-D) described above.
- SELECT Student.[First Name], Student.[Last Name], Student.City, Student.[Home Phone Number]
FROM Student; - SELECT Student.[First Name], Student.[Last Name], Student.City, Student.[Home Phone Number]
FROM Student
WHERE (((Student.[First Name]) Like "M*") AND ((Student.City)="Syracuse")); - SELECT Student.[First Name], Student.[Last Name], Student.City, Student.[Home Phone Number]
FROM Student
WHERE (((Student.City)="Piscataway")) OR (((Student.[First Name]) Like "M*")); - SELECT Student.[First Name], Student.[Last Name], Student.City, Student.[Home Phone Number]
FROM Student
WHERE (((Student.City)="Syracuse")) OR (((Student.City)="Piscataway"));
To Create a New Query in Design View Click Create
Source: https://web.lemoyne.edu/~voorhedp/csc151/ResourcesV1/Access2003/MSAccess2003Ref_Query.html
0 Response to "To Create a New Query in Design View Click Create"
Postar um comentário